Search Term:
Showing posts with label Cell Phone Tips. Show all posts

Saturday, November 21, 2009

Complete List Of Nokia Series 40 Phones | Updated 2009

Complete list of Nokia series 40 phones | updated 2009

The index below help you with finding out what is your phone resolution and edition.

================

Series 40 6th Edition

240 x 320
________
Nokia X3
Nokia 6750 Mural
Nokia 3720 classic
Nokia 3710 fold
Nokia 7020
Nokia 6700 classic
Nokia 6303 classic
Nokia 7510 Supernova
Nokia 5330 Mobile TV Edition

320 x 480
________
Nokia 6260 slide

================

Series 40 5th Edition, Feature Pack 1 Lite

128 x 160
________
Nokia 2323 classic
Nokia 2720 fold
Nokia 2330 classic
Nokia 2320 classic
Nokia 2680 slide
Nokia 2220 slide

240 x 320
________
Nokia 7100 Supernova
Nokia 5000

================

Series 40 5th Edition, Feature Pack 1

240 x 320
________
Nokia 3208 classic
Nokia 6600i slide
Nokia 2730 classic
Nokia 6216 classic
Nokia 2700 classic
Nokia 6208 classic
Nokia 8800 Gold Arte
Nokia 5130 XpressMusic
Nokia 8800 Carbon Arte
Nokia 7210 Supernova
Nokia 7310 Supernova
Nokia 6600 fold
Nokia 6600 slide
Nokia 3600 slide
Nokia 5220 XpressMusic
Nokia 6212 classic
Nokia 6300i
Nokia 3120 classic
Nokia 8800 Arte
Nokia 6301
Nokia 5310 XpressMusic
Nokia 5610 XpressMusic
Nokia 7900 Prism
Nokia 6500 classic
Nokia 6500 slide
Nokia 7610 Supernova

128 x 160
________
Nokia 3555
Nokia 2690

================

Series 40 5th Edition Lite

128 x 160
________
Nokia 1680 classic
Nokia 7070 Prism
Nokia 2600 classic
Nokia 2630
Nokia 2660
Nokia 2760

================

Series 40 5th Edition

240 x 320
________
Nokia 3610 fold
Nokia 6263
Nokia 6555
Nokia 7500 Prism
Nokia 6267

================

Series 40 3rd Edition, Feature Pack 2

128 x 160
________
Nokia 3110 Evolve
Nokia 3500 classic
Nokia 3109 classic
Nokia 3110 classic
Nokia 6085
Nokia 6086
Nokia 5200

240 x 320
________
Nokia 6300
Nokia 5300
Nokia 7373
Nokia 7390

================

Series 40 3rd Edition, Feature Pack 1

240 x 320
________
Nokia 8600 Luna
Nokia 6131 NFC
Nokia 6133
Nokia 6126
Nokia 6131
Nokia 6233
Nokia 6234

128 x 160
________
Nokia 6125
Nokia 6136
Nokia 6151

208 x 208
________
Nokia 8800 Sirocco Edition


================

Series 40 3rd Edition

240 x 320
________
Nokia 6288
Nokia 6275
Nokia 6275i
Nokia 6282
Nokia 6280
Nokia 6265
Nokia 6265i
Nokia 6270
Nokia 7370

128 x 160
________
Nokia 2865i
Nokia 2865
Nokia 6165
Nokia 6111

================

Series 40 2nd Edition

128 x 160
________
Nokia 2855
Nokia 3152
Nokia 3155
Nokia 3155i
Nokia 5070
Nokia 6060
Nokia 6070
Nokia 6080
Nokia 6101
Nokia 6102
Nokia 6102i
Nokia 6103
Nokia 6152
Nokia 6155
Nokia 6155i
Nokia 6170
Nokia 6255
Nokia 7270
Nokia 7360

128 x 128
________
Nokia 2626
Nokia 2610
Nokia 3220
Nokia 5140
Nokia 5140i
Nokia 6020
Nokia 6030
Nokia 6230
Nokia 6235
Nokia 6235i
Nokia 6822
Nokia 7260

208 x 208
________
Nokia 6230i
Nokia 8800
Nokia 8801

================

Series 40 1st Edition

128 x 128
________
Nokia 2355
Nokia 2650
Nokia 3100
Nokia 3105
Nokia 3108
Nokia 3120
Nokia 3125
Nokia 3200
Nokia 3205
Nokia 3300
Nokia 3300 Americas
Nokia 5100
Nokia 6100
Nokia 6108
Nokia 6200
Nokia 6220
Nokia 6225
Mokia 6560
Nokia 6585
Nokia 6610
Nokia 6610i
Nokia 6800
Nokia 6800 Americas
Nokia 6810
Nokia 6820
Nokia 7200
Nokia 7210
Nokia 7250
Nokia 7250i


96 x 65
________
Nokia 3510i
Nokia 3520
Nokia 3530
Nokia 3560
Nokia 3585i
Nokia 3586
Nokia 3586i
Nokia 3587
Nokia 3587i
Nokia 3590
Nokia 3595
Nokia 6010
Nokia 6012
Nokia 6015
Nokia 6015i
Nokia 8910i


128 x 160
________
Nokia 7600
Nokia 6651

Thursday, November 19, 2009

Verify Your Mobile IMEI Number Online For Free

Verify Your Mobile IMEI Number Online For Free

Many a Times, we have asked ourselves this question: Is my IMEI/Phone Authentic?????
The reason this question pops up is Chinese Manufacturers are flooding the World Market with cheap imitation phones. (I went to a dubious shop & came across a Nokia 6300: Exact Body, But OS, completely different!!!!)
This put me to thinking, If I buy a phone, how do I verify my IMEI is unique. It is very likely, that a Chinese Vendor might have manufactured the phone & inserted some Nokia model's IMEI.
Extensive Online Search yielded the Following Site:

Click here to verify

Wednesday, November 18, 2009

Secret Codes Of Nokia

Secret Codes Of Nokia

To check the IMEI (International Mobile Equipment Identity) :


*#06#

Information you get from the IMEI :

XXXXXX XX XXXXXX X

TAC FAC SNR SP

TAC = Type approval code
FAC = Final assembly code
SNR = Serial number
SP = Spare

To check the phone Software Version (Firmware) :

*#0000#

Information you get from the it : (eg)

V 5.0604.0
23-01-06
RM-51

1ST Line = Software Version (Firmware)
2ND Line = The date of the software release
3RD Line = Phone type

Displays Bluetooth (BT) Device Address :

*#2820#

Displays MAC address of the WLAN adapter :

*#62209526#
This is available only in the newer devices that support WLAN.

To enter the service menu :

*#92702689#

Displays Serial number (IMEI).
Displays Production date (MM/YY).
Displays Purchase date (MM/YY). You can only enter the date once.
Displays Date of last repair (0000=No repair).
The next screen has Transfer User Data.
To exit this menu, turn the phone off and then back on.

Enhanced Full Rate Codec (EFR) :

Enhanced Full Rate will give you much better sound quality when you enable it. The new Enhanced Full Rate CODEC adopted by GSM uses the ASELP (AlgebraicCode Excitation Linear Prediction) compression technology. This technology allows for much greater voice quality in the same number of bits as the older Full Rate CODEC. The older technology was called LPC-RPE (Linear Prediction Coding with Regular Pulse Excitation). Both operate at 13 kilobits.(but you take up more space on the network, so they can charge you more). Also this improves call quality but decreases battery life by about 5%.

*3370#
EFR will be activated after a reboot of the phone (consumes more power).

#3370#
EFR will be switched off after a reboot of the phone.

Half Rate Codec (HR) :

Half Rate will give you bad sound quality, which gives the service provider the opportunity to have more calls on the network; and you might get a lower charge from them. (Will give you 30% longer talk-time).

*4720#
Half Rate coded will be activated after a reboot of the phone (better standby time).

#4720#
Half Rate coded will be de-activated after a reboot of the phone.

Clock Stopping :

*#746025625#

To check if the Sim-Clock can be Stopped. This option is dependant on your service provider network. (Sim-clock-stop is a kind of standby mode which will save battery time).

CHECK SIM-LOCK :

Note - If you bought your Nokia on UK Vodafone or UK Cellnet you do not need to check this because they both transmit on GSM900, and they don't lock the phones. However if you bought your phone on UK Orange or UK One2one your phone may be blocked. The reason is that they both transmitt on GSM1800. To make a call on GSM1800 you need what is known as a "Dual band" phone. A dual band phone is able to transmit on both GSM900 and GSM1800, so they lock the phones so you can't use it with any other network simcard. If you find that your phone is locked you can try different software to unlock it or you can ask your service provider who will gladly exchange the 10 digit code for a price.

This is how to check the status of the 4 different locks. Also don't try entering the wrong number, because after 3 times it will block the phone for good.

There are 4 different locks on your Nokia phone :

COUNTRY-LOCK
NETWORK-LOCK
PROVIDER-LOCK
SIMCARD-LOCK

The code to read out the sim-lock status of your phone is :

#PW+(MASTERCODE)+(Y)#

MASTERCODE =
1234567890
Y = NUMBER 1 TO 4

The master code is a secret code. The code has 10 digits. It must be computed with a program e.g. SmartDCT4Calc and/or DCT 4 code Calculator from IMEI etc.

"Y" Shows the status of the network-lock. Here you can enter a number from "1" to "4". The "4" is for the sim-card lock.

SIM-LOCK CHECKS :

#PW+1234567890+1# = GIVES PROVIDER-LOCK STATUS
#PW+1234567890+2# = GIVES NETWORK-LOCK STATUS
#PW+1234567890+3# = GIVES COUNTRY-LOCK STATUS
#PW+1234567890+4# = GIVES SIM-CARD-LOCK STATUS

Detail About Your Phone Os (Operating System)

Detail About Your Phone Os (Operating System)

Symbian OS software written for the S60 Platform 1st edition (S60v1) or 2nd edition (S60v2) is not binary compatible with S60 3rd edition (S60v3), because it uses a new, hardened version of the Symbian OS (v9.1).

Series 60 Version 1.0, based on Symbian OS 6.1

* Nokia 7650 (development name Calypso)

Series 60 1st Edition (Version 1.2), based on Symbian OS 6.1

* Nokia 3600
* Nokia 3620 (GSM 850/1900 successor of the 3650)
* Nokia 3650
* Nokia 3660 (GSM 900/1800/1900 successor of the 3650)
* Nokia N-Gage and N-Gage QD
* Samsung SGH-D700
* Sendo X
* Sendo X2
* Siemens SX1

Series 60 2nd Edition (Version 2.0), based on Symbian OS 7.0s

Contains new features like J2ME/MIDP 2.0 support and themes

* Nokia 6600 (development name Calimero)
* Samsung SGH-D710

Series 60 2nd Edition, Feature Pack 1 (Version 2.1), based on Symbian OS 7.0s

* Nokia 3230
* Nokia 6260
* Nokia 6620
* Nokia 6670
* Nokia 7610
* Panasonic X700
* Panasonic X800

Series 60 2nd Edition, Feature Pack 2 (Version 2.6), based on Symbian OS version 8.0a

Symbian 8.x has support for WCDMA (GSM 3G) and cdma2000 networks.

* Nokia 6630
* Nokia 6680
* Nokia 6681
* Nokia 6682

Series 60 2nd Edition, Feature Pack 3 (Version 2.8.), based on Symbian OS version 8.1a

* Nokia N70
* Nokia N72
* Nokia N90

S60 3rd Edition (Version 3.0), based on Symbian OS version 9.1

* Nokia 3250
* Nokia 5500
* Nokia E50
* Nokia E60
* Nokia E61
* Nokia E62
* Nokia E70
* Nokia N71
* Nokia N80
* Nokia N91
* Nokia N92
* Nokia N93
* Nokia N73

S60 3rd Edition, Feature Pack 1 (Version 3.1), based on Symbian OS version 9.2

* LG JoY
* Nokia 6290
* Nokia N95
* Samsung SGH-i520


S60v5

* N 97
* Nokia 5800
* Nokia 5230
* Nokia 5530
* Samsung i8910

* Sony Ericsson Satio

Tuesday, November 17, 2009

10 BlackBerry Troubleshooting Tips

10 BlackBerry Troubleshooting Tips

1 Check the signal strength
Checking the signal strength of your handheld will verify whether or not your handheld has a strong enough
signal to send and receive wireless information.
- Turn on your handheld.
- Click the Options icon. The Options screen appears.
- Click Status. The Status screen appears.
- In the Signal field, verify the value is less than 100dBm. A weak signal shows a number higher than
100dBm, such as 111dBm.
Note: For BlackBerry handhelds based on Java™, verify GPRS, 1X or NXTL network status indicators appear
in the status section of the screen.

2 Reset your handheld
Reset your handheld by completing one of the following steps:
• Press the Alt key + the Shift key + the Backspace key simultaneously
• Insert a paper clip into the reset hole, located beneath the battery cover, to perform a hard reset. On
some handhelds the reset hole is located the back of the handheld.

3 Check Network Settings
Checking the network settings on your handheld will verify that your handheld is properly configured to
send and receive information on the wireless network.
For handhelds based on Java:
1. On your handheld, click the Options icon. The Options screen appears.
2. Click Network. The Network screen appears.
3. Click Scan for Networks and verify the handheld is running on the correct network.
For handhelds based on C++:
1. On your handheld, click the Options icon. The Options screen appears.
2. Click Network Settings. The Network Settings screen appears.
3. In the Radio field, verify the value is set to On.
4. Verify the correct country is displayed for Roaming.
5. Verify the Status is active.
6. Click the track wheel. A menu appears.
7. Click Register Now and verify the handheld registration request has been sent.
Contact your service provider if you are unable to register the handheld, unable to connect to the correct
network, or do not have the correct options displayed in Roaming or Status fields.

4 Confirm the handheld-to-computer connection
Confirm that the handheld connects properly to the desktop computer.
1. Confirm the handheld is properly connected to the computer.
2. Close and re-open the BlackBerry Desktop Manager software on your computer.
3. Verify the handheld is detected.

5 Synchronize your handheld and desktop applications
Synchronizing your handheld with your desktop applications will verify that the information is up to date in
each location.
1. Connect the handheld to the desktop.
2. Open Desktop Manager and double-click the Intellisync icon. The Intellisync window appears.
3. Click Configure PIM. The Handheld Configuration window appears.
4. Select the application check boxes you want to synchronize.
5. Click OK. The Intellisync window appears.
6. Verify the Synchronize PIM option is selected.
7. Click Synchronize Now.

6 Send a test email message to your handheld
Send a test email message from your desktop email account (on your personal computer) to your handheld.
If you receive the message in your handheld Inbox, this verifies your mail server is able to process internal
messaging.

7 Send an email message and peer-to-peer message from your handheld
Confirm that you can send messages from your handheld to your desktop email account, or to other
handheld users:
1. Send a test email message from your handheld to your desktop email account.
2. Verify the email arrives in your Inbox and on your handheld.
3. Send a peer-to-peer message to another handheld or to your handheld to verify it is sent and received
successfully.

8 Verify messages are being redirected to your handheld
Verify that messages are being redirected to your handheld, based on your email redirection method:
• BlackBerry Enterprise Server: Check with your BlackBerry Server administrator to verify the server is
online and operating as expected.
• BlackBerry Desktop Redirector: Confirm the BlackBerry Desktop Redirector software is running on the
computer and it displays a status of Running.
• BlackBerry Internet Service: Contact your service provider to verify the account is provisioned correctly.

9 Run the Application Loader
Running the application loader will help you verify that your applications are loaded correctly.
Warning: Back up your handheld data with the Backup and Restore utility before you complete the
following steps.
1. Connect the handheld to the desktop.
2. Open Desktop Manager and double-click the Application Loader icon.
3. Click Next.
4. Follow the on-screen instructions.

10 Search the Technical Knowledge Center
To search the Technical Knowledge Center for specific issues and troubleshooting tips, refer to
http://www.blackberry.com/knowledgecenter

Monday, November 16, 2009

Common iPhone Problems And Their Solutions

Common iPhone Problems And Their Solutions

If iPhone doesn't appear in iTunes or you can't sync iPhone
  1. The iPhone battery might need to be recharged. For information about charging iPhone, see "Charging the Battery" in the iPhone User's Guide.
  2. If that doesn't work, disconnect other USB devices from your computer and connect iPhone to a different USB 2.0 port on your computer (not on your keyboard).
  3. If that doesn't work, turn iPhone off and turn it on again. Press and hold the Sleep/Wake button on top of iPhone for a few seconds until a red slider appears, and then slide the slider. Then press and hold the Sleep/Wake button until the Apple logo appears.

    Note: If you enter the SIM PIN incorrectly three times, you may need to contact your carrier for a Personal Unlocking Key (PUK) to enable your SIM card again.
  4. If that doesn't work, restart your computer and reconnect iPhone to your computer.
  5. If that doesn't work, download and install (or reinstall) the latest version of iTunes.

If you can't make or receive calls, send or receive text messages, or access email or the web
  1. Check the cell signal indicator in the status bar at the top of the screen. If there are no bars, or if it says "No service," try moving to a different location. If you're indoors, try going outdoors or moving closer to a window.
  2. Check to make sure you’re in an area with network coverage. Go to your carrier's website to see network coverage areas.
  3. Make sure airplane mode isn't on. From the Home screen choose Settings, then turn Airplane Mode off.
  4. If that doesn't work, turn airplane mode on, wait 15 seconds, then turn airplane mode off again.
  5. Make sure to include an area code for every phone number in your contacts list that you use to send or receive text messages.
  6. If that doesn't work, turn iPhone off and turn it on again. Press and hold the Sleep/Wake button on top of iPhone for a few seconds until a red slider appears, then slide the slider. Then press and hold the Sleep/Wake button until the Apple logo appears.

    Note: If you enter the SIM PIN incorrectly three times, you may need to contact your carrier for a Personal Unlocking Key (PUK) to enable your SIM card again.
  7. If that doesn't work, there may be an issue with your wireless service. Call your carrier or go to your carrier's website.
  8. If that doesn't work, restore the iPhone software.
MMS: Original iPhone does not support MMS. MMS is available on iPhone 3G and iPhone 3GS if it is supported by the wireless carrier.


If iPhone won't turn on, or the display freezes or doesn't respond
  1. Press and hold the Home button for at least six seconds, until the application you were using quits.
  2. If that doesn't work, turn iPhone off and turn it on again. Press and hold the Sleep/Wake button on top of iPhone for a few seconds until a red slider appears, and then slide the slider. Then press and hold the Sleep/Wake button until the Apple logo appears.
  3. If that doesn't work, reset iPhone. Press and hold the Sleep/Wake button and the Home button at the same time for at least ten seconds, until the Apple logo appears.
If iPhone continues to freeze or not respond after you reset it
  1. Reset iPhone settings. From the Home screen choose Settings > General > Reset > Reset All Settings. All your preferences are reset, but no data or media is deleted.
  2. If that doesn't work, reset iPhone. Press and hold the Sleep/Wake button and the Home button at the same time for at least ten seconds, until the Apple logo appears restore the iPhone software.

How to make your own iPhone Ringtone and transfer it to your iPhone directly?

How to make your own iPhone Ringtone and transfer it to your iPhone directly?

Here are the steps:
  1. Open iTunes.
  2. Find the song (audio file) that you want to make into a ringtone.
  3. Decide the part of the song you'd like to use as your ringtone and make a note of the start and stop times of the song.
  4. Right-click the song and select Get Info and click the Options tab.
  5. Type in the start time of your ringtone in the Start Time text box in the minutes:seconds format. (ex. 3:41)
  6. Type in the end time of your ringtone inthe Stop Time text box. (Make sure the ringtone is no more than 40 seconds)
  7. Click OK. then Right-click the song again and select Convert Selection to AAC. Wait for iTunes to convert your song. It will create a duplicate file.
  8. Right-click the ringtone and select Delete.
  9. Click to you see the option to Keep Files.
  10. Find the file under Music > iTunes > iTunes Music and under the band's/artist's name. It will have an extension of "m4a."
  11. Replace the m4a extension of your ringtone with m4r. You can either double-click slowly to rename your file, or right-click and select Get Info on a Mac or Rename on a Windows PC.
    Note: If you are unable to rename the extension then go to Tools > Folder Options > View > and temporarily uncheck "Hide Extensions for know file types".
  12. Click use .m4r or and ignore any warnings about changing.
  13. Double-click the ringtone file. iTunes will automatically add it to your ringtones folder in your iTunes Music Library.
  14. Connect your iPhone and sync your ringtones. It should now be available on your iPhone.
If you are having trouble syncing, find the ringtone in your Ringtones folder and change the extension back to .M4A, then attempt to sync again. Then instead of deleting it, you can also drag the newly converted ringtone to your desktop from iTunes.

This will not work with songs bought from the iTunes store or that have DRM (copy protection). It's probably best to rip the song from a CD you own. Also, this may not work with the latest version of Leopard.

Sunday, November 15, 2009

How to install themes with certificate expired error

How to install themes with certificate expired error

Have you ever installed a theme and got the expired certificate message? Follow the steps below to install the theme and bypass the error.

You can easily bypass the expired certificate error, go to Menu > Tools > Application Manager then press (options) button, select (settings), enable all software installation and disable the online certificate check.

If that does not work just change the year to 2006 and install the theme, once finished installing you just change back to the current year.

Sunday, November 8, 2009

China Mobile Secret Codes

China Mobile Secret Codes

Default user code : 1122, 3344, 1234, 5678
Engineer mode : *#110*01#
Factory mode : *#987#
Enable COM port : *#110*01# -> Device -> Set UART -> PS Config -> UART1/115200
Restore factory settings : *#987*99#
LCD contrast : *#369#
Software version : *#800#
Software version : *#900#
Set default language : *#0000# Send
Set English language : *#0044# Send
Set English language (new firmware) : *#001# Send

Monday, November 2, 2009

How to jailbreak iphone/iPod Touch OS 3.1.2 with blackra1n RC 2

How to jailbreak iphone/iPod Touch OS 3.1.2 with blackra1n RC 2

1.Download iTunes 8


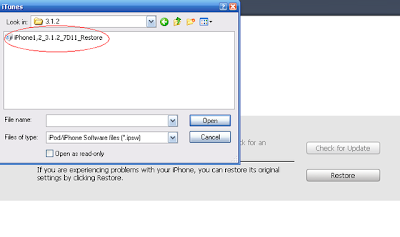
2.Restore to OS 3.1.2 via iTunes.


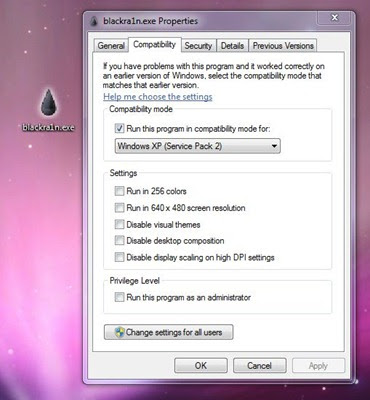
3.Once your iphone/iPod Touch has upgraded to 3.1.2, download blackra1n. Use Windows XP compatibility mode if you’re using Windows Vista or Windows 7


4.Launch the tool, and click the ‘make it ra1n’ button

5.It’ll take sometime while your iPod Touch is jailbroken. You’ll see George’s picture, which means it’s working.

6.After it’s down, it’ll restart.

7.You should see the blackra1n icon in your apps now. Launch it.

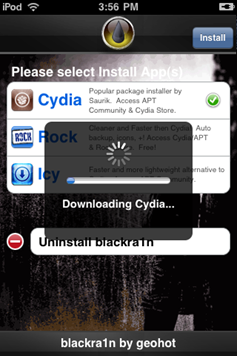
8.From here, you can install Cydia, which lets you install jailbreak applications. There is an option to install Rock or Icy as well, which are Cydia alternatives.

Special Thanks To Ithinkdiff.com

Tuesday, October 27, 2009

Samsung Omnia - How to set mp3 to ringtones quickly

Samsung Omnia - How to set mp3 to ringtones quickly
If you have a mp3 file on your memory/storage device just click and hold for a few seconds as it will pop up a menu and you can select it as ringtone. No need to physically copy to your ringtone menu as it does it all for you. It is simple easy methode for setting up ringtone.

Sunday, October 18, 2009

Complete 3.1 Jailbreak / Unlock Guide (+ IPSW Download) Available

Complete 3.1 Jailbreak / Unlock Guide (+ IPSW Download) Available

OS 3.1 hacks still unavailable for iPhone 3GS and newer iPod touch modelsPwnageTool application icon (jailbreak & unlock tool)
Weeks into the release of iPhone OS 3.1 and months into that of OS 3.0, iPhone and iPod touch users looking to unlock and / or jailbreak their devices are still having trouble with these two otherwise simple tasks. With the help of PwnageTool 3.1, or the latest version of redsn0w, iPhone and iPod touch owners can easily hack their devices.

However, sometimes it’s easier said than done, when it comes to the iPhone and iPod touch. For those looking to jailbreak an iPhone 2G, iPhone 3G or iPhone 3GS, as well as any of the three iPod touch models available today, CultOfMac hosts what is probably the most comprehensive guide to unlocking and jailbreaking the iPhone and iPod touch to date.

Downloads are available for PwnageTool 3.1; Redsn0w 0.8;

iPhone1,1_3.1_7C144_Restore.ipsw (first-gen iPhone);

iPhone1,2_3.1_7C144_Restore.ipsw (iPhone 3G). iPhone 3Gs users are offered the iPhone2,1_3.0_7A341_Restore.ipsw for the 3.1 jailbreak that is currently unavailable on Apple’s latest iPhone model. The iPhone Dev Team (responsible for the two aforementioned hack tools) are actively working on providing a reliable jailbreak & unlock solution for iPhone 3GS and iPod Touch 2nd and 3rd generation for firmware 3.1. The guide also offers instructions on how to unlock one's iPhone in order to use a different carrier than AT&T.

Softpedia doesn't condone jailbreaking / unlocking the iPhone / iPod touch or any other device. This article has a purely informational purpose and doesn't, in any way, suggest that you should hack your Apple device. Using hacks may render your device unusable, or may reduce the quality of your experience using the respective device.

If you choose to download and install jailbreak tools, you will do so at your own risk. Unlocking / jailbreaking your iPhone / iPod touch may violate your warranty or the EULA with Apple and / or your cellular-service provider.

Sunday, October 4, 2009

How To Check Your Mobile Quality

How To Check Your Mobile Quality

Saturday, October 3, 2009

http://homeworktips.about.com: Cell Phone Tips and Tricks - Students and Cell Phones

Reminders and alarms are some of the most useful tools on a cell phone, but they are also the least appreciated.

Most cell phones come with a scheduler to allow you to set an alarm at a certain time of day or on a certain date. You can set alarms to remind you of an established daily homework time to keep you from chatting right through your work time. For instance, you can set up a beeper that goes off every night at 7.

You could also use calendar reminders to notify you when projects and assignments are due. These reminders can be set up weeks and months ahead of time." http://homeworktips.about.com/od/schoolsupplies/tp/cellphones.htm

Tuesday, September 29, 2009

Guide to Enabling MMS on iPhone 3.0 Without 3.1 Update

Guide to Enabling MMS on iPhone 3.0 Without 3.1 Update

Tutorial available for enabling iPhone MMS on your own terms


It appears there is a way to enable iPhone MMS without upgrading your firmware to version 3.1, according to a report by OS X Daily. You must simply download the carrier file that enables the functionality. AT&T’s update apparently doesn’t require the iPhone OS 3.1 IPSW (update/restore) file from Apple in order to enable MMS on second- and third-generation iPhones.

As most iPhone fanatics should know, MMS works only on iPhone 3G and iPhone 3GS, while the former doesn’t support video MMS. However, iPhone OS 3.1 is not required to enable the multimedia messaging service from AT&T, according to at least one iPhone user.

“After reading all the bad press for iPhone OS 3.1, I decided to hold out on upgrading, which means that I also can’t get MMS working, right? Wrong! The only thing you need to enable MMS on iPhone 3.0 (or 3.01) is the updated carrier file,” a person over at OS X Daily says, offering up a download via RapidShare. After downloading the “ATT_US.ipcc” carrier file, users must first ensure iTunes is closed and then type the following command in the terminal:

defaults write com.apple.iTunes carrier-testing -bool TRUE

Upon launching iTunes again, users must select their iPhone and employ the selective ‘Restore’ function by holding down the option key as they hit the Restore button. iPhone owners must then navigate to the location of the.ipcc they’ve just downloaded and select it for restoring. “The update will take a few seconds, and then all you need to do is reboot your iPhone for MMS to work with 3.0,” the author of the guide says.

The poster fails to mention whether or not iPhone OS 3.0 / 3.0.1 users are still eligible for receiving the AT&T carrier file the normal way – by connecting to iTunes and waiting for AT&T to push the update to them. After all, Apple did its MMS-support-bit with the release of iPhone OS 3.0.

Saturday, September 26, 2009

Trick to free up your N73's phone memory C: by 5MB...

Trick to free up your N73's phone memory C: by 5MB...

Steps:

  1. Hack your phone..Disable Plat security by CapsOff
  2. Go to C:/private/102072c4 folder You will find a file named "reserved " of size 4.76MB
  3. Delete it (Dont hesitate)
  4. Congrats you've recovered ~5MB memory
  5. CapsOn

    why we Kicking this file out?

    This reserved file is for FOTA (firmware over the air), and we wont need it as we never get any FOTA updates.It does eventually come back at times..most probably when you use the Device mgr. So at those times u can delete it again...Deleting this file will not affect your phone...I tested and using my N73 without any prob..

    Warning: If you Wish, make a backup of the file in your Memory Card.

5 Tips to Make Your Cell Phone Battery Last Longer

5 Tips to Make Your Cell Phone Battery Last Longer

Reducing power consumption helps fight global warming

Batteries can have a much longer life, if people follow just a few simple tips on how to save their power

Modern mobile phones have numerous applications installed, as well as a bunch of other features, including photo cameras, blitzes, Bluetooth devices and others. All these accessories take up large amounts of electricity from the battery, prompting users to recharge them more often. This consumes a lot of electric energy, placing unnecessary strain on power plants, to supply more juice.

Using energy-saving settings is a great way of reducing the overall electrical consumption of your phone, especially if you turn off the back light, which accounts for the depletion of the battery to a great extent. Screen-savers are also huge power drains, as they animate the screen even when the phone is still in the pocket.

New photo editing software, built into most mobile phones, are undoubtedly a great way of fine-tuning a photo on the spot, freshly after the moment it was taken. But using the blitz and the included pieces of software places great strain on the battery, which may need recharging after a couple of hours playing with these accessories. A good way to avoid this is by taking pictures in sunny spots, where additional lights are not required, and editing them at home.

Usually, if you stop an average guy on the street and take his phone, you will notice it has Bluetooth and WiFi turned on, as well as GPS, e-mail applications and several feeds, for the weather, sports results, news and whatnot. Turning all these applications off once you've finished working with them is a great way to save power. Also, when on the move, turn off the phone completely, as there's no signal anyway, and it takes a lot of power for the device to look for a connection.

Headsets are another one of life's little wonders, especially in a crowded place, where movements such as reaching inside your pocket are impossible. But you don't necessarily need a Bluetooth device for that; corded headphones work just as well. In fact, they might save you from curious glances, which are inevitably drawn to you when people think you're talking to yourself.

The next step is the easiest one – simply take care of the battery physically. Its contacts may become covered in dust or other such stuff, so cleaning them once in a while might prove to be an excellent idea. The link between the phone and the battery itself will be near perfect, and the amounts of electricity the battery will need to generate will be much smaller.

Disclaimer

Disclaimer: This blog does not host any files on its server. All Mobile Phone Softwares,Wallpapers, Games, Themes Sport Links or any other stuff on this blog have been collected from various sources from Public Domains. So I am not responsible for any kind of deletion of files or copyright matters. If you are the rightful owner of anything and object to them being displayed, please COMMENT on my blog or Email us blogformobile@yahoo.com for removal.