Search Term:
Showing posts with label Tips and Tricks. Show all posts

Wednesday, December 9, 2009

Find Mobile Number Info (Phone Number Look Up)

Find Mobile Number Info

You have got a missed call from a unknown number and you want to know the about that number. just put that number in MobileNumberInfo and this will show the detals of that number.

-: Download :-

Mobile Number Info OR Mirror Mobile Number Info

Magic Code of Nokia

Magic Code of Nokia 1208, 1600, 2600, 2310

These codes will invert or rotate the screen of your mobiles. You can have fun with your friends and make them fool by doing the trick with his/her mobile.

Here are the codes:

*#5512#

*#5513#

*#5514#

NORMAL MODE

*#5511#

Tuesday, December 1, 2009

How to Free Up Your 5800 C Drive Space

How to Free Up Your 5800 C Drive Space

Yes, it is true that your 5800 has its internal flash memory that reaches 88MB. In common case, people assume that it will be more than enough for your everyday usage. But though, through intensive use such as web browse, update firmware OTA as well as install and remove the 3rd party apps and so on, your 88MB memory will be disappear easily, right? Further more, there are reports regarding this internal memory which said that half of that memory can lose after any updates. Of course, no one will say it is good for your device.

So, now how to free up your C drive of this device? Try the following allaboutsymbian advice.

* you can delete your direct downloads that have done
* free up any trial apps that have installed on your
Internal memory
* delete the large attachments come from Messaging
* the \cache folder located on your C: can be deleted using the utility of file manager
* for freeing up your memory that used for maps caching, please choose Options > Tools >
Reset (of course if you are an user of Google Maps).

So, how about the other methods? Try this if the above seems less effective.

* Go to File Mgr (find it in App folder). Make sure the present free space located on C drive listed
as Phone Memory
* On Backup do double tap then make sure the Backup contents has been set to All
* You can now backup your
internal memory. Put it to the memory card using Options and select
Back up now.
* If it has finished, you can go to your homescreen dial pad for tapping out this, *#7370# (this is
the code for asking hard reset can be used for all S60 phones). So it will wipe the whole C drive and
the phone will create again the necessary folders. Your device will restart.
* Back to your File Mgr for checking the free space on your C drive (it should show 88MB)
* Choose on Backup again then Options and Restore
* Check the entire content boxes then click OK. It will need time to restore the whole data back
* You can restart your phone
* Back to File Mgr, notice that now you have more free space located on C drive.

For more information

Saturday, November 21, 2009

Complete List Of Nokia Series 40 Phones | Updated 2009

Complete list of Nokia series 40 phones | updated 2009

The index below help you with finding out what is your phone resolution and edition.

================

Series 40 6th Edition

240 x 320
________
Nokia X3
Nokia 6750 Mural
Nokia 3720 classic
Nokia 3710 fold
Nokia 7020
Nokia 6700 classic
Nokia 6303 classic
Nokia 7510 Supernova
Nokia 5330 Mobile TV Edition

320 x 480
________
Nokia 6260 slide

================

Series 40 5th Edition, Feature Pack 1 Lite

128 x 160
________
Nokia 2323 classic
Nokia 2720 fold
Nokia 2330 classic
Nokia 2320 classic
Nokia 2680 slide
Nokia 2220 slide

240 x 320
________
Nokia 7100 Supernova
Nokia 5000

================

Series 40 5th Edition, Feature Pack 1

240 x 320
________
Nokia 3208 classic
Nokia 6600i slide
Nokia 2730 classic
Nokia 6216 classic
Nokia 2700 classic
Nokia 6208 classic
Nokia 8800 Gold Arte
Nokia 5130 XpressMusic
Nokia 8800 Carbon Arte
Nokia 7210 Supernova
Nokia 7310 Supernova
Nokia 6600 fold
Nokia 6600 slide
Nokia 3600 slide
Nokia 5220 XpressMusic
Nokia 6212 classic
Nokia 6300i
Nokia 3120 classic
Nokia 8800 Arte
Nokia 6301
Nokia 5310 XpressMusic
Nokia 5610 XpressMusic
Nokia 7900 Prism
Nokia 6500 classic
Nokia 6500 slide
Nokia 7610 Supernova

128 x 160
________
Nokia 3555
Nokia 2690

================

Series 40 5th Edition Lite

128 x 160
________
Nokia 1680 classic
Nokia 7070 Prism
Nokia 2600 classic
Nokia 2630
Nokia 2660
Nokia 2760

================

Series 40 5th Edition

240 x 320
________
Nokia 3610 fold
Nokia 6263
Nokia 6555
Nokia 7500 Prism
Nokia 6267

================

Series 40 3rd Edition, Feature Pack 2

128 x 160
________
Nokia 3110 Evolve
Nokia 3500 classic
Nokia 3109 classic
Nokia 3110 classic
Nokia 6085
Nokia 6086
Nokia 5200

240 x 320
________
Nokia 6300
Nokia 5300
Nokia 7373
Nokia 7390

================

Series 40 3rd Edition, Feature Pack 1

240 x 320
________
Nokia 8600 Luna
Nokia 6131 NFC
Nokia 6133
Nokia 6126
Nokia 6131
Nokia 6233
Nokia 6234

128 x 160
________
Nokia 6125
Nokia 6136
Nokia 6151

208 x 208
________
Nokia 8800 Sirocco Edition


================

Series 40 3rd Edition

240 x 320
________
Nokia 6288
Nokia 6275
Nokia 6275i
Nokia 6282
Nokia 6280
Nokia 6265
Nokia 6265i
Nokia 6270
Nokia 7370

128 x 160
________
Nokia 2865i
Nokia 2865
Nokia 6165
Nokia 6111

================

Series 40 2nd Edition

128 x 160
________
Nokia 2855
Nokia 3152
Nokia 3155
Nokia 3155i
Nokia 5070
Nokia 6060
Nokia 6070
Nokia 6080
Nokia 6101
Nokia 6102
Nokia 6102i
Nokia 6103
Nokia 6152
Nokia 6155
Nokia 6155i
Nokia 6170
Nokia 6255
Nokia 7270
Nokia 7360

128 x 128
________
Nokia 2626
Nokia 2610
Nokia 3220
Nokia 5140
Nokia 5140i
Nokia 6020
Nokia 6030
Nokia 6230
Nokia 6235
Nokia 6235i
Nokia 6822
Nokia 7260

208 x 208
________
Nokia 6230i
Nokia 8800
Nokia 8801

================

Series 40 1st Edition

128 x 128
________
Nokia 2355
Nokia 2650
Nokia 3100
Nokia 3105
Nokia 3108
Nokia 3120
Nokia 3125
Nokia 3200
Nokia 3205
Nokia 3300
Nokia 3300 Americas
Nokia 5100
Nokia 6100
Nokia 6108
Nokia 6200
Nokia 6220
Nokia 6225
Mokia 6560
Nokia 6585
Nokia 6610
Nokia 6610i
Nokia 6800
Nokia 6800 Americas
Nokia 6810
Nokia 6820
Nokia 7200
Nokia 7210
Nokia 7250
Nokia 7250i


96 x 65
________
Nokia 3510i
Nokia 3520
Nokia 3530
Nokia 3560
Nokia 3585i
Nokia 3586
Nokia 3586i
Nokia 3587
Nokia 3587i
Nokia 3590
Nokia 3595
Nokia 6010
Nokia 6012
Nokia 6015
Nokia 6015i
Nokia 8910i


128 x 160
________
Nokia 7600
Nokia 6651

Thursday, November 19, 2009

Verify Your Mobile IMEI Number Online For Free

Verify Your Mobile IMEI Number Online For Free

Many a Times, we have asked ourselves this question: Is my IMEI/Phone Authentic?????
The reason this question pops up is Chinese Manufacturers are flooding the World Market with cheap imitation phones. (I went to a dubious shop & came across a Nokia 6300: Exact Body, But OS, completely different!!!!)
This put me to thinking, If I buy a phone, how do I verify my IMEI is unique. It is very likely, that a Chinese Vendor might have manufactured the phone & inserted some Nokia model's IMEI.
Extensive Online Search yielded the Following Site:

Click here to verify

Wednesday, November 18, 2009

Secret Codes Of Nokia

Secret Codes Of Nokia

To check the IMEI (International Mobile Equipment Identity) :


*#06#

Information you get from the IMEI :

XXXXXX XX XXXXXX X

TAC FAC SNR SP

TAC = Type approval code
FAC = Final assembly code
SNR = Serial number
SP = Spare

To check the phone Software Version (Firmware) :

*#0000#

Information you get from the it : (eg)

V 5.0604.0
23-01-06
RM-51

1ST Line = Software Version (Firmware)
2ND Line = The date of the software release
3RD Line = Phone type

Displays Bluetooth (BT) Device Address :

*#2820#

Displays MAC address of the WLAN adapter :

*#62209526#
This is available only in the newer devices that support WLAN.

To enter the service menu :

*#92702689#

Displays Serial number (IMEI).
Displays Production date (MM/YY).
Displays Purchase date (MM/YY). You can only enter the date once.
Displays Date of last repair (0000=No repair).
The next screen has Transfer User Data.
To exit this menu, turn the phone off and then back on.

Enhanced Full Rate Codec (EFR) :

Enhanced Full Rate will give you much better sound quality when you enable it. The new Enhanced Full Rate CODEC adopted by GSM uses the ASELP (AlgebraicCode Excitation Linear Prediction) compression technology. This technology allows for much greater voice quality in the same number of bits as the older Full Rate CODEC. The older technology was called LPC-RPE (Linear Prediction Coding with Regular Pulse Excitation). Both operate at 13 kilobits.(but you take up more space on the network, so they can charge you more). Also this improves call quality but decreases battery life by about 5%.

*3370#
EFR will be activated after a reboot of the phone (consumes more power).

#3370#
EFR will be switched off after a reboot of the phone.

Half Rate Codec (HR) :

Half Rate will give you bad sound quality, which gives the service provider the opportunity to have more calls on the network; and you might get a lower charge from them. (Will give you 30% longer talk-time).

*4720#
Half Rate coded will be activated after a reboot of the phone (better standby time).

#4720#
Half Rate coded will be de-activated after a reboot of the phone.

Clock Stopping :

*#746025625#

To check if the Sim-Clock can be Stopped. This option is dependant on your service provider network. (Sim-clock-stop is a kind of standby mode which will save battery time).

CHECK SIM-LOCK :

Note - If you bought your Nokia on UK Vodafone or UK Cellnet you do not need to check this because they both transmit on GSM900, and they don't lock the phones. However if you bought your phone on UK Orange or UK One2one your phone may be blocked. The reason is that they both transmitt on GSM1800. To make a call on GSM1800 you need what is known as a "Dual band" phone. A dual band phone is able to transmit on both GSM900 and GSM1800, so they lock the phones so you can't use it with any other network simcard. If you find that your phone is locked you can try different software to unlock it or you can ask your service provider who will gladly exchange the 10 digit code for a price.

This is how to check the status of the 4 different locks. Also don't try entering the wrong number, because after 3 times it will block the phone for good.

There are 4 different locks on your Nokia phone :

COUNTRY-LOCK
NETWORK-LOCK
PROVIDER-LOCK
SIMCARD-LOCK

The code to read out the sim-lock status of your phone is :

#PW+(MASTERCODE)+(Y)#

MASTERCODE =
1234567890
Y = NUMBER 1 TO 4

The master code is a secret code. The code has 10 digits. It must be computed with a program e.g. SmartDCT4Calc and/or DCT 4 code Calculator from IMEI etc.

"Y" Shows the status of the network-lock. Here you can enter a number from "1" to "4". The "4" is for the sim-card lock.

SIM-LOCK CHECKS :

#PW+1234567890+1# = GIVES PROVIDER-LOCK STATUS
#PW+1234567890+2# = GIVES NETWORK-LOCK STATUS
#PW+1234567890+3# = GIVES COUNTRY-LOCK STATUS
#PW+1234567890+4# = GIVES SIM-CARD-LOCK STATUS

Detail About Your Phone Os (Operating System)

Detail About Your Phone Os (Operating System)

Symbian OS software written for the S60 Platform 1st edition (S60v1) or 2nd edition (S60v2) is not binary compatible with S60 3rd edition (S60v3), because it uses a new, hardened version of the Symbian OS (v9.1).

Series 60 Version 1.0, based on Symbian OS 6.1

* Nokia 7650 (development name Calypso)

Series 60 1st Edition (Version 1.2), based on Symbian OS 6.1

* Nokia 3600
* Nokia 3620 (GSM 850/1900 successor of the 3650)
* Nokia 3650
* Nokia 3660 (GSM 900/1800/1900 successor of the 3650)
* Nokia N-Gage and N-Gage QD
* Samsung SGH-D700
* Sendo X
* Sendo X2
* Siemens SX1

Series 60 2nd Edition (Version 2.0), based on Symbian OS 7.0s

Contains new features like J2ME/MIDP 2.0 support and themes

* Nokia 6600 (development name Calimero)
* Samsung SGH-D710

Series 60 2nd Edition, Feature Pack 1 (Version 2.1), based on Symbian OS 7.0s

* Nokia 3230
* Nokia 6260
* Nokia 6620
* Nokia 6670
* Nokia 7610
* Panasonic X700
* Panasonic X800

Series 60 2nd Edition, Feature Pack 2 (Version 2.6), based on Symbian OS version 8.0a

Symbian 8.x has support for WCDMA (GSM 3G) and cdma2000 networks.

* Nokia 6630
* Nokia 6680
* Nokia 6681
* Nokia 6682

Series 60 2nd Edition, Feature Pack 3 (Version 2.8.), based on Symbian OS version 8.1a

* Nokia N70
* Nokia N72
* Nokia N90

S60 3rd Edition (Version 3.0), based on Symbian OS version 9.1

* Nokia 3250
* Nokia 5500
* Nokia E50
* Nokia E60
* Nokia E61
* Nokia E62
* Nokia E70
* Nokia N71
* Nokia N80
* Nokia N91
* Nokia N92
* Nokia N93
* Nokia N73

S60 3rd Edition, Feature Pack 1 (Version 3.1), based on Symbian OS version 9.2

* LG JoY
* Nokia 6290
* Nokia N95
* Samsung SGH-i520


S60v5

* N 97
* Nokia 5800
* Nokia 5230
* Nokia 5530
* Samsung i8910

* Sony Ericsson Satio

Tuesday, November 17, 2009

10 BlackBerry Troubleshooting Tips

10 BlackBerry Troubleshooting Tips

1 Check the signal strength
Checking the signal strength of your handheld will verify whether or not your handheld has a strong enough
signal to send and receive wireless information.
- Turn on your handheld.
- Click the Options icon. The Options screen appears.
- Click Status. The Status screen appears.
- In the Signal field, verify the value is less than 100dBm. A weak signal shows a number higher than
100dBm, such as 111dBm.
Note: For BlackBerry handhelds based on Java™, verify GPRS, 1X or NXTL network status indicators appear
in the status section of the screen.

2 Reset your handheld
Reset your handheld by completing one of the following steps:
• Press the Alt key + the Shift key + the Backspace key simultaneously
• Insert a paper clip into the reset hole, located beneath the battery cover, to perform a hard reset. On
some handhelds the reset hole is located the back of the handheld.

3 Check Network Settings
Checking the network settings on your handheld will verify that your handheld is properly configured to
send and receive information on the wireless network.
For handhelds based on Java:
1. On your handheld, click the Options icon. The Options screen appears.
2. Click Network. The Network screen appears.
3. Click Scan for Networks and verify the handheld is running on the correct network.
For handhelds based on C++:
1. On your handheld, click the Options icon. The Options screen appears.
2. Click Network Settings. The Network Settings screen appears.
3. In the Radio field, verify the value is set to On.
4. Verify the correct country is displayed for Roaming.
5. Verify the Status is active.
6. Click the track wheel. A menu appears.
7. Click Register Now and verify the handheld registration request has been sent.
Contact your service provider if you are unable to register the handheld, unable to connect to the correct
network, or do not have the correct options displayed in Roaming or Status fields.

4 Confirm the handheld-to-computer connection
Confirm that the handheld connects properly to the desktop computer.
1. Confirm the handheld is properly connected to the computer.
2. Close and re-open the BlackBerry Desktop Manager software on your computer.
3. Verify the handheld is detected.

5 Synchronize your handheld and desktop applications
Synchronizing your handheld with your desktop applications will verify that the information is up to date in
each location.
1. Connect the handheld to the desktop.
2. Open Desktop Manager and double-click the Intellisync icon. The Intellisync window appears.
3. Click Configure PIM. The Handheld Configuration window appears.
4. Select the application check boxes you want to synchronize.
5. Click OK. The Intellisync window appears.
6. Verify the Synchronize PIM option is selected.
7. Click Synchronize Now.

6 Send a test email message to your handheld
Send a test email message from your desktop email account (on your personal computer) to your handheld.
If you receive the message in your handheld Inbox, this verifies your mail server is able to process internal
messaging.

7 Send an email message and peer-to-peer message from your handheld
Confirm that you can send messages from your handheld to your desktop email account, or to other
handheld users:
1. Send a test email message from your handheld to your desktop email account.
2. Verify the email arrives in your Inbox and on your handheld.
3. Send a peer-to-peer message to another handheld or to your handheld to verify it is sent and received
successfully.

8 Verify messages are being redirected to your handheld
Verify that messages are being redirected to your handheld, based on your email redirection method:
• BlackBerry Enterprise Server: Check with your BlackBerry Server administrator to verify the server is
online and operating as expected.
• BlackBerry Desktop Redirector: Confirm the BlackBerry Desktop Redirector software is running on the
computer and it displays a status of Running.
• BlackBerry Internet Service: Contact your service provider to verify the account is provisioned correctly.

9 Run the Application Loader
Running the application loader will help you verify that your applications are loaded correctly.
Warning: Back up your handheld data with the Backup and Restore utility before you complete the
following steps.
1. Connect the handheld to the desktop.
2. Open Desktop Manager and double-click the Application Loader icon.
3. Click Next.
4. Follow the on-screen instructions.

10 Search the Technical Knowledge Center
To search the Technical Knowledge Center for specific issues and troubleshooting tips, refer to
http://www.blackberry.com/knowledgecenter

Monday, November 16, 2009

Common iPhone Problems And Their Solutions

Common iPhone Problems And Their Solutions

If iPhone doesn't appear in iTunes or you can't sync iPhone
  1. The iPhone battery might need to be recharged. For information about charging iPhone, see "Charging the Battery" in the iPhone User's Guide.
  2. If that doesn't work, disconnect other USB devices from your computer and connect iPhone to a different USB 2.0 port on your computer (not on your keyboard).
  3. If that doesn't work, turn iPhone off and turn it on again. Press and hold the Sleep/Wake button on top of iPhone for a few seconds until a red slider appears, and then slide the slider. Then press and hold the Sleep/Wake button until the Apple logo appears.

    Note: If you enter the SIM PIN incorrectly three times, you may need to contact your carrier for a Personal Unlocking Key (PUK) to enable your SIM card again.
  4. If that doesn't work, restart your computer and reconnect iPhone to your computer.
  5. If that doesn't work, download and install (or reinstall) the latest version of iTunes.

If you can't make or receive calls, send or receive text messages, or access email or the web
  1. Check the cell signal indicator in the status bar at the top of the screen. If there are no bars, or if it says "No service," try moving to a different location. If you're indoors, try going outdoors or moving closer to a window.
  2. Check to make sure you’re in an area with network coverage. Go to your carrier's website to see network coverage areas.
  3. Make sure airplane mode isn't on. From the Home screen choose Settings, then turn Airplane Mode off.
  4. If that doesn't work, turn airplane mode on, wait 15 seconds, then turn airplane mode off again.
  5. Make sure to include an area code for every phone number in your contacts list that you use to send or receive text messages.
  6. If that doesn't work, turn iPhone off and turn it on again. Press and hold the Sleep/Wake button on top of iPhone for a few seconds until a red slider appears, then slide the slider. Then press and hold the Sleep/Wake button until the Apple logo appears.

    Note: If you enter the SIM PIN incorrectly three times, you may need to contact your carrier for a Personal Unlocking Key (PUK) to enable your SIM card again.
  7. If that doesn't work, there may be an issue with your wireless service. Call your carrier or go to your carrier's website.
  8. If that doesn't work, restore the iPhone software.
MMS: Original iPhone does not support MMS. MMS is available on iPhone 3G and iPhone 3GS if it is supported by the wireless carrier.


If iPhone won't turn on, or the display freezes or doesn't respond
  1. Press and hold the Home button for at least six seconds, until the application you were using quits.
  2. If that doesn't work, turn iPhone off and turn it on again. Press and hold the Sleep/Wake button on top of iPhone for a few seconds until a red slider appears, and then slide the slider. Then press and hold the Sleep/Wake button until the Apple logo appears.
  3. If that doesn't work, reset iPhone. Press and hold the Sleep/Wake button and the Home button at the same time for at least ten seconds, until the Apple logo appears.
If iPhone continues to freeze or not respond after you reset it
  1. Reset iPhone settings. From the Home screen choose Settings > General > Reset > Reset All Settings. All your preferences are reset, but no data or media is deleted.
  2. If that doesn't work, reset iPhone. Press and hold the Sleep/Wake button and the Home button at the same time for at least ten seconds, until the Apple logo appears restore the iPhone software.

How to make your own iPhone Ringtone and transfer it to your iPhone directly?

How to make your own iPhone Ringtone and transfer it to your iPhone directly?

Here are the steps:
  1. Open iTunes.
  2. Find the song (audio file) that you want to make into a ringtone.
  3. Decide the part of the song you'd like to use as your ringtone and make a note of the start and stop times of the song.
  4. Right-click the song and select Get Info and click the Options tab.
  5. Type in the start time of your ringtone in the Start Time text box in the minutes:seconds format. (ex. 3:41)
  6. Type in the end time of your ringtone inthe Stop Time text box. (Make sure the ringtone is no more than 40 seconds)
  7. Click OK. then Right-click the song again and select Convert Selection to AAC. Wait for iTunes to convert your song. It will create a duplicate file.
  8. Right-click the ringtone and select Delete.
  9. Click to you see the option to Keep Files.
  10. Find the file under Music > iTunes > iTunes Music and under the band's/artist's name. It will have an extension of "m4a."
  11. Replace the m4a extension of your ringtone with m4r. You can either double-click slowly to rename your file, or right-click and select Get Info on a Mac or Rename on a Windows PC.
    Note: If you are unable to rename the extension then go to Tools > Folder Options > View > and temporarily uncheck "Hide Extensions for know file types".
  12. Click use .m4r or and ignore any warnings about changing.
  13. Double-click the ringtone file. iTunes will automatically add it to your ringtones folder in your iTunes Music Library.
  14. Connect your iPhone and sync your ringtones. It should now be available on your iPhone.
If you are having trouble syncing, find the ringtone in your Ringtones folder and change the extension back to .M4A, then attempt to sync again. Then instead of deleting it, you can also drag the newly converted ringtone to your desktop from iTunes.

This will not work with songs bought from the iTunes store or that have DRM (copy protection). It's probably best to rip the song from a CD you own. Also, this may not work with the latest version of Leopard.

Sunday, November 15, 2009

How to install themes with certificate expired error

How to install themes with certificate expired error

Have you ever installed a theme and got the expired certificate message? Follow the steps below to install the theme and bypass the error.

You can easily bypass the expired certificate error, go to Menu > Tools > Application Manager then press (options) button, select (settings), enable all software installation and disable the online certificate check.

If that does not work just change the year to 2006 and install the theme, once finished installing you just change back to the current year.

Thursday, November 12, 2009

100% Solution & Guide How To Activate Any Sim And Unlock iPhone 3.1.2

>>>100% SOLUTION & GUIDE HOW TO ACTIVATE ANY SIM AND UNLOCK IPHONE 3.1.2<<<

1. Restore Iphone to 3.1.2 Official Software via ITUNES

2. Run Blackra1n http://www.blackra1n.com/blackra1n.exe

- DO NOT do anything in the phone, do not make it sn0w !! Just run the program on the computer.

3. Put Iphone in Restore mode. (itune and cable on screen)

4. Restore iphone with this custom activated firmware 3.1.2

http://www.megaupload.com/?d=WQR1IZZ9 3GS

http://www.megaupload.com/?d=I7X7NM2W 3G

5. Run Blackra1n

AGAIN :
- DO NOT do anything in the phone, do not make it sn0w !! Just run the program on the computer.

6. Run Install.bat from blacksn0w no wifi
http://www.megaupload.com/?d=K17M0QWY

7. Turn off phone, turn back on again.

Phone UNLOCKED, ACTIVATED , JAILBROKEN

...BUT no signs of blacksn0w in the phone ...

Sunday, November 8, 2009

China Mobile Secret Codes

China Mobile Secret Codes

Default user code : 1122, 3344, 1234, 5678
Engineer mode : *#110*01#
Factory mode : *#987#
Enable COM port : *#110*01# -> Device -> Set UART -> PS Config -> UART1/115200
Restore factory settings : *#987*99#
LCD contrast : *#369#
Software version : *#800#
Software version : *#900#
Set default language : *#0000# Send
Set English language : *#0044# Send
Set English language (new firmware) : *#001# Send

Wednesday, November 4, 2009

Blacksn0w Is Live* Now Unlock IPhone 3G, 3GS 3.1.2 and baseband 05.11.07

blacksn0w is live* Now Unlock IPhone 3G, 3GS 3.1.2 and baseband 05.11.07 !!!!!


blacksn0w is a free unlock for the latest iPhone 3G and 3GS
blackra1n is a super simple jailbreak used to install unlock
new visitors, go to blackra1n.com download and have fun

blackra1n RC3 is also live for both Windows and Mac!!! Clean firmware 3.1.2 and baseband 05.11.07 are recommended.

Updates:
Unlock!!!
Hacktivation
Keep legit activation if activated before running app
15 seconds faster, you'll feel it
Tiger + PPC support

Go to blackra1n.com to download
For support, blackra1n.support at gmail...but read this first

blacksn0w is also available on Cydia, add blackra1n.com as repo
requires firmware >= 3.1 and baseband 05.11.07

iClarified has made some nice tutorials:

How to Jailbreak and Unlock Your iPhone 3G, 3GS Using BlackSn0w [Windows]
How to Jailbreak and Unlock Your iPhone 3G, 3GS Using BlackSn0w [Mac

P.S : this is just copy/past Special thanks to Geohot for making this unlock possible

Free Call Worldwide

Free Call worldwide

Here are some sites to call free worldwide from your pc or mobiles

1. http://www.vivophone.com/
2. http://www.tokiva.com/
3. http://www.mobivox.com
4. http://www.rebtel.com
5. http://www.iamvoip.com/

keep visiting , i will update it soon...

Monday, November 2, 2009

How to jailbreak iphone/iPod Touch OS 3.1.2 with blackra1n RC 2

How to jailbreak iphone/iPod Touch OS 3.1.2 with blackra1n RC 2

1.Download iTunes 8


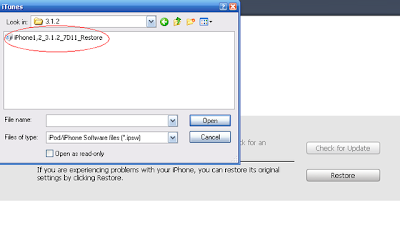
2.Restore to OS 3.1.2 via iTunes.


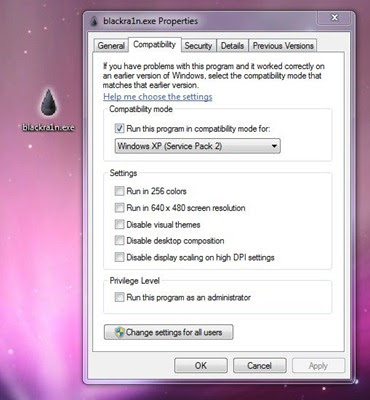
3.Once your iphone/iPod Touch has upgraded to 3.1.2, download blackra1n. Use Windows XP compatibility mode if you’re using Windows Vista or Windows 7


4.Launch the tool, and click the ‘make it ra1n’ button

5.It’ll take sometime while your iPod Touch is jailbroken. You’ll see George’s picture, which means it’s working.

6.After it’s down, it’ll restart.

7.You should see the blackra1n icon in your apps now. Launch it.

8.From here, you can install Cydia, which lets you install jailbreak applications. There is an option to install Rock or Icy as well, which are Cydia alternatives.

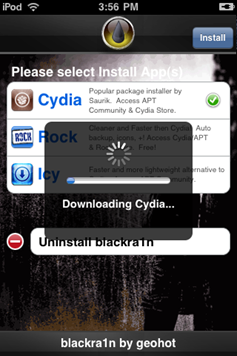
Special Thanks To Ithinkdiff.com

Wednesday, October 28, 2009

Nokia N97 Gets Firmware v20 With a wide range of improvements

Nokia N97 Gets Firmware v20 With a wide range of improvements
Finnish mobile phone maker Nokia has just released a new software version for the high-end Nokia N97 handset, which comes with the version number 20.0.019, 20.1.021 or 20.2.019, depending on the region users are from. The new version is said to deliver a nice series of improvements over the previously available software, yet one should note that not all model numbers are supported in this update.

The changes the new firmware v20 comes with should include (via All About Symbian):

- Kinetic scrolling in the User Interface in all lists and larger-than-screen views
- The keyboard driver has been enhanced so that a long press on any key brings up its associated 'function' symbol (or number)
- Music player shows album art more reliably, plus extra MP3 ID3 information
- Half a dozen new social media and service widgets have been added by default
- Camera still and video improvements
- Offline mode for homescreen widgets (shown below)
- The N-Gage client is now included (shown below, saving 10MB of your C disk, compared to the current situation)
- Ovi Maps 3.1 is now included (shown below, saving 7MB of your C disk, compared to the current situation)
Nokia N97 gets firmware v20
Enlarge picture
- Ovi Contacts and Ovi Store clients now integrated (saving more space)
- More responsive touchscreen driver (so fewer 'missed taps') and the usual minor bug fixes across the board
- Improvements to Sync system.

Those who own a Nokia N97 and would like to update it to the latest software version available can do so via the Nokia Software Update. Users can check for updates by going to the 'Sw update' application in their phone. The handset, as many of you might already know, comes with UDP (User Data Preservation), yet a backup of all data on the handset is recommended before proceeding with the update process, just to make sure that no important files are lost.

The new software solution also comes with a reworked memory mapping model, which means that applications are bound to make a more efficient use of the RAM features of the device. The available 'Free RAM' after booting is said to be lower, 47MB, yet applications should use less memory than before.

Tuesday, October 27, 2009

How To Reset Samsung PY-T9 and PY-T9J

How To Reset Samsung PY-T9 and PY-T9J


or

press rec and the center button in the front for like 2-3sec

it is not a phone, it is just like ipod...it is portable video/audio player...etc....

Samsung i780 Hard Reset

Samsung i780 Hard Reset

1. Press and hold call and end call buttons together +

2. Press RESET with stylus

3. Hold them until LED turns red, then release RESET, keep pressing call and end call buttons until prompt message

4. Press space to format phone.

Samsung i607 Blackjack hard reset

Samsung i607 Blackjack Hard Reset

Samsung i607 Blackjack hard reset


Resetting your Phone

When the phone is powered off press the Up Navigation key and the Power key at the same time
Storage and setting are wiped clean, eject the microSD memory card before doing a hard reset.

or

You can reset your phone’s settings and clear all added data from memory.

Resetting the Phone

1. On the Home screen, press the Start soft key
2. Select Settings > More... > Security > More... >Reset.
3. Enter the reset password and press the Done soft key.The default password is 0000.
4. Press the Yes soft key to confirm. The phone resets andreboots itself.

Disclaimer

Disclaimer: This blog does not host any files on its server. All Mobile Phone Softwares,Wallpapers, Games, Themes Sport Links or any other stuff on this blog have been collected from various sources from Public Domains. So I am not responsible for any kind of deletion of files or copyright matters. If you are the rightful owner of anything and object to them being displayed, please COMMENT on my blog or Email us blogformobile@yahoo.com for removal.